Monday, August 3, 2015
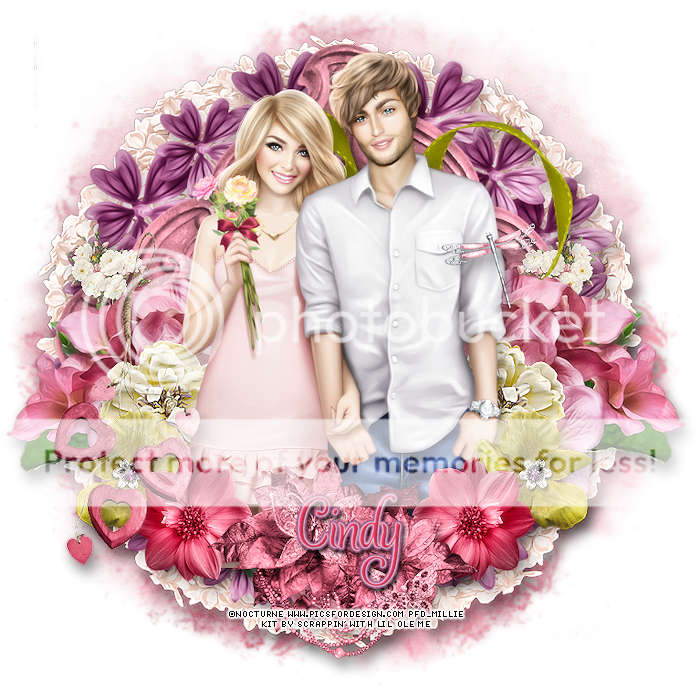
*click on image to view full size*
PTU Flowery and In Love
This tutorial was written by me on Aug 3, 2015.
It was made out of my own creation and any similarity is purely coincidental.
I used pspx6 but any version should work without problems.
If you're doing this tutorial you must have good psp knowledge and be familiar with the tools.
Let's get started!
Artist: Couple by Nocturne
Scrapkit: PTU Johanna by Scrappin' With Lil Ole Me
Mask: 102 by me HERE
Font: Any of choice
*open your mask and minimize in your workspace*
c/p = copy and paste, ds = drop shadow
File - New - 700x700 - flood fill w white
Click on background with magic wand - new layer
Open paper1 - c/p into selection - deselect
Layers - New mask layer - From Image
Find your mask in source window - hit ok
Merge group
Open 101 - resize by 50%
Effects - Mura Meister - Copies w Following settings:
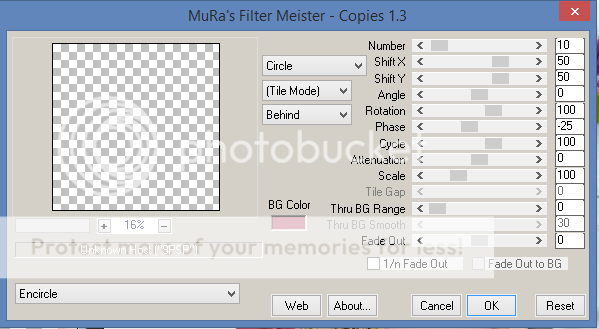
Hit ok and then add drop shadow
Open 20 - c/p as new layer - place on top of circle of flowers - add drop shadow
Open 14 - c/p as new layer - place on top of 20 - ds
Open 89 - resize by 50% 2x - sharpen - place to left
Duplicate - mirror - merge down and ds
Open 78 - place to top right - ds
Open 83 - resize by 65% - place to the right
Duplicate and mirror - add drop shadow to both
Open 81 - resize by 50% 2x - place to the left
Duplicate and mirror - add drop shadow to both
Open tube and resize to liking
Place to middle of tag - duplicate your tube and change blend to screen
Change opacity of top tube to 40 - merge down
Add drop shadow to your merged tube
Open 32 - resize by 50% 2x - place to top right - ds
Open 77 - resize by 50% 2x - place to right
Duplicate - mirror - add drop shadow to both
Open 72 - resize by 50% 2x - place to right
Duplicate - mirror - add drop shadow to both
Open 66 - resize by 50% - place to bottom - ds
Open 53 - resize by 50% - place to left and down some ds
Delete background layer - merge visible
Adjust - Brightness and Contrast
Local Tone Mapping - strength 4.0 - Block Size 35 - hit ok
Add credits and name
Sunday, July 5, 2015

CT FOR GIMPTASTIC SCRAPS
*click on image to view full size*
PTU Waters are Dark
This tutorial was written by me on July 6, 2015.
It was made out of my own creation and any similarity is purely coincidental.
I used pspx6 but any version should work without problems.
If you're doing this tutorial you must have good psp knowledge and be familiar with the tools.
Let's get started!
Artist: Little Mermaid by Johannah Von Frankenstein
Scrapkit: Dark Waters by Gimptastic Scraps
Mask: 62 by moonbeams and spiderwebs
Font: Viner Hand ITC
*open your mask and minimize in your workspace*
c/p = copy and paste, ds = drop shadow
File - New - 700x700 - flood fill w white
Click on background with magic wand - new layer
Open paper10 - c/p into selection - deselect
Layers - New mask layer - From Image
Find your mask in source window - hit ok
Merge group
Open 47 - place to top right
Opne frame 4 - rotate to the left - c/p as new layer
Open tube close up - move under frame 4
Place the face so its inside the left rectangle in the frame
Click inside frame 4 with your magic wand
Selections - expand - 20 - hit ok
On tube layer - invert - delete - invert again - new layer
Open pp4 - copy and paste into selection
Selections - none
Move paper under tube layer
Add drop shadow to frame 4
Open 3 - resize by 80% - move to the right some - ds
Open 1 - place to the bottom - ds
Open 4 - place to bottom left - ds
Open 33 - resize by 50% - place to bottom left - ds
Open full tube - resize to your liking and place to the right some
Add drop shadow to your tube
Open 21 - resize by 60% - place to bottom right - ds
Open 29 - resize by 50% - place to bottom left - ds
Open 2 resize by 50% 2x place to bottom - ds
Open 27 - resize by 75% - place to bottom right - ds
Open 26 - resize by 50% 2x - sharpen - place to bottom
Make sure flower is between right and middle skull
Duplicate 26 - Image - flip - horizontal place between left and middle skull
Add drop shadow to both flowers
Delete background layer - merge visible
Adjust - Brightness and Contrast
Local Tone Mapping - strength 4.0 - Block Size 35 - hit ok
Add credits and name
Sunday, May 31, 2015
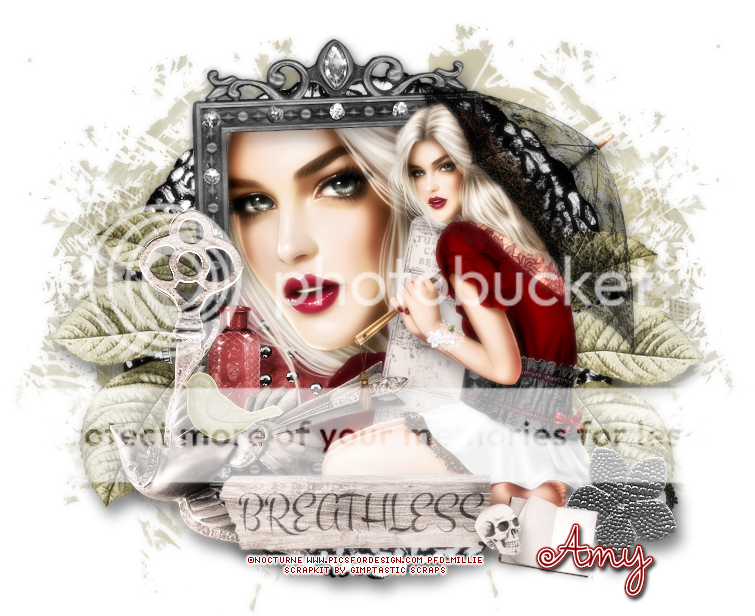
*click on image to view full size*
PTU So Breathless
This tutorial was written by me on May 31, 2015.
It was made out of my own creation and any similarity is purely coincidental.
I used pspx7 but any version should work without problems.
If you're doing this tutorial you must have good psp knowledge and be familiar with the tools.
Let's get started!
Artist: Parasol by Nocturne
Scrapkit: Breathless by Gimptastic Scraps
Plugin: Xero - Radiance
Font: Amelie
*open your mask and minimize in your workspace*
c/p = copy and paste, ds = drop shadow
File - New - 700x700 - flood fill w white
Open ele 30 - c/p as new layer - place to right
Duplicate - mirror - merge down
Open frame 6 - resize by 85% - move down some - ds
Open ele57 - place to left
Duplicate - mirror
Add drop shadow to both
Open frame 1 - resize by 75% - move down some
Open tube and place under your frame
Make sure face of your tube is inside of your frame
Open 11 - c/p as new layer and place under tube
Click inside frame 1 w magic wand tool
Expand by 5 and go on tube layer - invert - delete
On element 11 layer and delete
New layer
Open pp2 - c/p into selection - deselect
Move paper under element 11
Add drop shadow to element 11
On tube layer - apply xero - radiance plugin w following changes
Change beauty to 103 and hit ok
Add drop shadow to your tube
Add drop shadow to your frame
Open 34 - place to left - ds
Open 44 - resize by 50% - rotate to the right some - place to right - ds
Open 37 - resize by 50% - place to bottom right - ds
Open 41 - place to bottom left - ds
Open 54 - resize by 50% - place to bottom left - ds
Open tube - resize to liking - place to right
Apply Xero - Radiance with same settings as before
Add drop shadow to your tube
Open 36 - resize by 50% - place to bottom right - ds
Open 53 - resize by 50% 2x - sharpen - place to bottom right - ds
Delete background layer
Adjust - Brightness and Contrast
Local Tone Mapping - strength 4.0 - Block Size 35 - hit ok
Add credits and your name
Tuesday, May 12, 2015
*click on image to view full size*
PTU Let's Have a Lovely Day
This tutorial was written by me on May 12, 2015.
It was made out of my own creation and any similarity is purely coincidental.
I used pspx6 but any version should work without problems.
If you're doing this tutorial you must have good psp knowledge and be familiar with the tools.
Let's get started!
Artist: Megan by Tony Tz
Scrapkit: Lovely Day by Gimptastic Scraps
Mask: 102 by me HERE
Font: Yangtze
*open your mask and minimize in your workspace*
c/p = copy and paste, ds = drop shadow
File - New - 700x700 - flood fill w white
Open frame 2 - resize by 70% - c/p as new layer - move to left
Open full tube and place under frame
Make sure the face is inside the frame to your liking
Click inside your frame w your magic wand - expand by 5
On tube layer - invert - delete - invert - new layer
Open pp3 - c/p into selection - deselect
Move paper under tube layer
On tube layer - change blend mode to overlay
Duplicate your tube
Add drop shadow to frame 2
Open tag - resize by 50% - place to top - ds
Open grass - place to right - ds
Open heartbox - resize by 50% - place to bottom - ds
Open flower4 - reszie by 50% twice - sharpen - place to bottom - ds
Open leaf4 - place to right - ds
Open tube - resize to liking - place to bottom right
Apply plugin Xero - Porcelain
Change the blue channel to 0 and hit ok
Add ds to your tube
On background layer
Click on background with magic wand - new layer
Open paper9 - c/p into selection - deselect
Layers - New mask layer - From Image
Find your mask in source window - hit ok
Merge group
Open vine - place to bottom left - ds
Open stones - place to right and bottom some - ds
Open plant - place to right - ds
Duplicate plant - move up and left some - ds
Delete background layer - merge visible
Add credits and name
Wednesday, May 6, 2015

*click on image to view full size*
FTU Red Haze
This tutorial was written by me on May 6, 2015.
It was made out of my own creation and any similarity is purely coincidental.
I used pspx6 but any version should work without problems.
If you're doing this tutorial you must have good psp knowledge and be familiar with the tools.
Let's get started!
Artist: Lady in Red by Kajenna
Scrapkit: Sorrowful You by Tasha's Playground
Plugins: MuraMeister - copies, Xero - Simplicity
Mask: 102 by me HERE
Font: Waterbrush Rob
*open your mask and minimize in your workspace*
c/p = copy and paste, ds = drop shadow
File - New - 700x700 - flood fill w white
Click on background with magic wand - new layer
Open paper2 - c/p into selection - deselect
Layers - New mask layer - From Image
Find your mask in source window - hit ok
Merge group
Open net - c/p as new layer - place to the right - ds
Duplicate - mirror
Open frame 4 - resize by 95% - c/p as new layer - ds
Open flower - c/p as new layer
Effects - Mura Meister - Copies
Use the Encircle effect on default - hit ok
Add drop shadow
Open frame 3 - c/p as new layer
Open tube - c/p as new layer - place under the frame
With your magic wand - click inside the frame - expand by 5
On tube layer - invert - delete - invert
New layer
Open paper 8 - copy and paste into selection - deselect
Move paper under tube layer
On tube layer
Effects - xero - simplicity
(default settings) then hit okay
Change tube blend mode to screen
Duplicate your tube
Open light spots - c/p as new layer on top of tubes
Add drop shadow to your frame 3
Open ribbon - c/p as new layer - place to right - ds
Open leaves - place to bottom right - ds
Open flower 3 - resize by 50% - place to bottom right - ds
Duplicate flower 3 - move to the right some
Open goblet - resize by 50% - place to bottom right - ds
Open bird - resize by 50% - place to bottom right - ds
Delete background - merge visible
Add credits and name


*click on image to view full size*
PTU Lay Here Dreaming
This tutorial was written by me on May 6, 2015.
It was made out of my own creation and any similarity is purely coincidental.
I used pspx6 but any version should work without problems.
If you're doing this tutorial you must have good psp knowledge and be familiar with the tools.
Let's get started!
Artist: Sweet Dreamer by Laguna Art
Scrapkit: Sleep Tight by Scrappin With Lil Ole Me
Mask: DBV 111
Font: Janda Happy Day
*open your mask and minimize in your workspace*
c/p = copy and paste, ds = drop shadow
File - New - 700x700 - flood fill w white
Click on background with magic wand - new layer
Open paper4 - c/p into selection - deselect
Layers - New mask layer - From Image
Find your mask in source window - hit ok
Merge group
Open 105 - c/p as a new layer - move to top - ds
Open 80 - resize by 75% - place to left - ds
Open 84 - place to the top right - ds
Open 76 - resize by 50% - place to top right - ds
Open 73 - place to top and middle - ds
Open 1 - place to top - ds
Open 44 - resize by 50% - place to bottom - ds
Open 74 - resize by 50% - place to left - ds
Open 5 - resize by 50% - place to left - ds
Open 89 - place to bottom - ds
Open tube - resize by 50% 2x - sharpen - ds
Place to bottom some
Delete background - merge visible
Add credits and name
Thursday, April 30, 2015

*click on image to view full size*
PTU Love The Summer
This tutorial was written by me on April 30, 2015.
It was made out of my own creation and any similarity is purely coincidental.
I used pspx6 but any version should work without problems.
If you're doing this tutorial you must have good psp knowledge and be familiar with the tools.
Let's get started!
Artist: Candy by Jose Cano
Scrapkit: Summer Lovin by Scrappin With Lil Ole Me
Mask: 104 by me HERE
Font: Ambiance BT
*open your mask and minimize in your workspace*
c/p = copy and paste, ds = drop shadow
File - New - 700x700 - flood fill w white
Click on background with magic wand - new layer
Open paper25 - c/p into selection - deselect
Layers - New mask layer - From Image
Find your mask in source window - hit ok
Merge group
Open 135 - resize by 50% - place to top left - ds
Open 98 resize by 70% - c/p as new layer
Open tube close up - place under frame
Click inside your frame w magic wand - expand selection by 5
Add a new layer
Open paper1 - c/p into selection
Move paper under tube
On tube layer - invert - delete - deselect
Change blend mode to overlay
Add drop shadow to your frame
Open 95 - place to the left - ds
Open 71 - resize by 50% - place to the left - ds
Duplicate - mirror
Open 46 - resize by 50% 2x - sharpen - place to bottom left - ds
Open 36 - resize by 50% - place to left - ds
Open full tube - resize by 50% - place to the right - ds
Open 92 - resize by 50% 2x - sharpen - place to bottom left - ds
Open 84 - resize by 50% 2x - sharpen - place to bottom - ds
Open 35 - resize by 50% 2x - sharpen - place to bottom - ds
Delete background - merge visible
Add credits and name
Wednesday, April 22, 2015

*click on image to view full size*
PTU Spring Doggie
This tutorial was written by me on April 22, 2015.
It was made out of my own creation and any similarity is purely coincidental.
I used pspx6 but any version should work without problems.
If you're doing this tutorial you must have good psp knowledge and be familiar with the tools.
Let's get started!
Artist: Farm dog by Kajenna
Scrapkit: Spring day Blue Jay by Gimptastic Scraps
Mask: 102 by me HERE
Font: Dancing Script
*open your mask and minimize in your workspace*
c/p = copy and paste, ds = drop shadow
File - New - 700x700 - flood fill w white
Click on background with magic wand - new layer
Open paper10 - c/p into selection - deselect
Layers - New mask layer - From Image
Find your mask in source window - hit ok
Merge group
Frame 5 - resize by 75% - c/p as new layer
Click inside your frame w magic wand - expand selection by 5
Add a new layer
Open paper2 - c/p into selection - deselect
Move paper under frame
Add drop shadow to your frame
Open branch - place to top left - ds
Open grass - place to right - ds
Open flower 4 - place to middle - ds
Open flower 5 - place to bottom right - ds
Open heart 2 - place to bottom - ds
Open flower 3 - place to bottom right - ds
Open tube - resize to your liking and place to left - ds
Delete background - merge visible
Add credits and name
Sunday, April 19, 2015

*click on image to view full size*
PTU Blooming in Spring
This tutorial was written by me on April 19, 2015.
It was made out of my own creation and any similarity is purely coincidental.
I used pspx6 but any version should work without problems.
If you're doing this tutorial you must have good psp knowledge and be familiar with the tools.
Let's get started!
Artist: Braids by Nocturne
Scrapkit: Fly Away Home by Scrappin With Lil Ole Me
Mask: floral mask by Dee HERE
Font: Buttons and Patches
*open your mask and minimize in your workspace*
c/p = copy and paste, ds = drop shadow
File - New - 700x700 - flood fill w white
Click on background with magic wand - new layer
Open paper of choice - c/p into selection - deselect
Layers - New mask layer - From Image
Find your mask in source window - hit ok
Merge group
Open 99 - place to top left - ds
Open 139 - resize by 85% - place to right - ds
Open 17 - resize by 50% - place to top right - ds
Open 149 - place to the right - ds
Open 25 - resize by 65% - c/p as new layer
Open tube and place under the frame
With freehand tool set to point to point, draw a square around the frame
On tube layer - invert - delete
New layer - use paper of choice and copy into selection
Move paper under tube layer - deselect
On tube layer - change blend to overlay
Add drop shadow to the frame
Oepn 105 - resize by 50% - place to bottom left - ds
Open 67 - resize by 70% - place to bottom left - ds
Open 63 - resize by 75% - place to left - ds
Open 11 - resize by 50% 2x - sharpen - place to bottom right - ds
Open 134 - resize by 50% 2x - sharpen - place to bottom right - ds
Open 146 - resize by 50% 2x - sharpen - place to bottom right - ds
Open 86 - resize by 50% 2x - sharpen - place to bottom right - ds
Open 147 - resize by 50% 2x - sharpen - place to bottom - ds
Open tube - resize to liking - place to left - drop shadow
Open 29 - resize by 50% 2x - sharpen - place to bottom right - ds
Open 106 - resize by 50% 2x - sharpen - place to bottom - ds
Duplicate - move to left some
Open 74 - resize by 50% 2x - sharpen - place to right - ds
Delete background layer - merge visible
Add credits and name
Sunday, April 12, 2015

*click on image to view full size*
PTU Springy In The Air
This tutorial was written by me on April 12, 2015.
It was made out of my own creation and any similarity is purely coincidental.
I used pspx7 but any version should work without problems.
If you're doing this tutorial you must have good psp knowledge and be familiar with the tools.
Let's get started!
Artist: Verymany
Scrapkit: Signs of Spring by Gimptastic Scraps
Plugin: Xero - Porcelain
Font: any of choice
*open your mask and minimize in your workspace*
c/p = copy and paste, ds = drop shadow
File - New - 700x700 - flood fill w white
Open deco - place to bottom right - ds
Duplicate - mirror horizontal
Open frame 1 - resize by 75% - place to bottom - ds
Click inside your frame w magic wand - expand selection by 5
Add a new layer
Open paper4 - c/p into selection - deselect
Move paper under frame
Add drop shadow to your frame
Open ribbon - place to bottom - ds
Open butterflies - resize by 70% - place to left - ds
Open flower 2 - place to bottom right - ds
Open fence - resize by 70% - place to middle and down some - ds
Open beads - place to bottom right - ds
Open jar - place to right - ds
Open flower1 - place to right - ds
Open leaf1 - place to right - ds
Open nest - resize by 50% - place to bottom - ds
Open frog - place to bottom right - ds
Open lemon - resize by 50% 2x - sharpen - place to bottom left - ds
Open tube - resize by 50%
Using color changer - change clothes color to match tag
Copy merged as a new layer - place to left
Xero - porcelain - change blue channel to 0 - hit ok
Add drop shadow to your tube
Delete background layer - merge visible
Adjust - Brightness and Contrast
Local Tone Mapping - strength 4.0 - Block Size 35 - hit ok
Add credits and name
Sunday, March 29, 2015

*click on image to view full size*
PTU You Bring Me Sunshine
This tutorial was written by me on March 29, 2015.
It was made out of my own creation and any similarity is purely coincidental.
I used pspx6 but any version should work without problems.
If you're doing this tutorial you must have good psp knowledge and be familiar with the tools.
Let's get started!
Artist: Hippity by Salisan Al Giab
Scrapkit: Sunshine by Rissa's Designs
Mask: 104 by me HERE
Font: Plaster of Paris
*open your mask and minimize in your workspace*
c/p = copy and paste, ds = drop shadow
File - New - 700x700 - flood fill w white
Click on background with magic wand - new layer
Open paper8 - c/p into selection - deselect
Layers - New mask layer - From Image
Find your mask in source window - hit ok
Merge group
Open 43 - c/p as new layer
Click inside your frame w magic wand - expand selection by 5
Add a new layer
Open paper4 - c/p into selection - deselect
Move paper under frame
Add drop shadow to your frame
Open 99 - resize by 50% - place to the right - ds
Open 68 - resize by 50% 2x - sharpen - place to bottom right - ds
Open 71 - resize by 50% - place to the left - ds
Open tube - resize to liking - c/p as new layer - place to right
Add drop shadow to your tube
Open 50 - resize by 50% 2x - sharpen - place to bottom right - ds
Open 49 - resize by 50% 2x - sharpen - place to bottom right - ds
Open 54 - resize by 50% - place to bottom left - ds
Open 97 - resize by 50% 2x - sharpen - place to bottom left - ds
Open 64 - resize by 50% 2x - sharpen - place to bottom - ds
Delete background layer - merge visible
Add credits and name
Tuesday, March 24, 2015
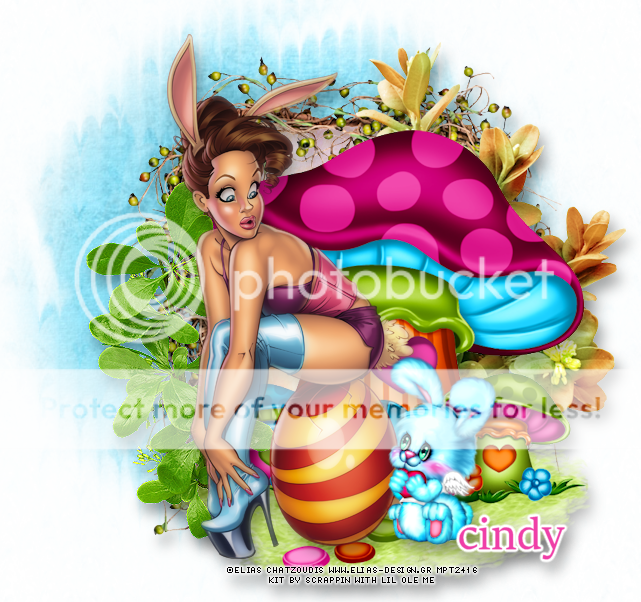
*click on image to view full size*
PTU Springy Bunny
This tutorial was written by me on March 24, 2015.
It was made out of my own creation and any similarity is purely coincidental.
I used pspx6 but any version should work without problems.
If you're doing this tutorial you must have good psp knowledge and be familiar with the tools.
Let's get started!
Artist: Happy Easter Babe by Elias Chatzoudis
Scrapkit: Karrot Patch by Scrappin With Lil Ole Me
Mask: DBV 106
Font: Sitka Heading
This will be quick and easy :)
*open your mask and minimize in your workspace*
c/p = copy and paste, ds = drop shadow
File - New - 700x700 - flood fill w white
Click on background with magic wand - new layer
Open paper17 - c/p into selection - deselect
Layers - New mask layer - From Image
Find your mask in source window - hit ok
Merge group
Open 56 - resize by 80% c/p as new layer
With your selection tool draw a rectangle around the frame
Add a new layer
Open pp16 then copy and paste into selection - deselect
Move paper under the frame
Add drop shadow to your frame
Open 111 - resize by 75% - place to the right - ds
Open 80 - resize by 75% - place to bottom right - ds
Open 127 - resize by 50% - place to the left - ds
Open tube - copy and paste to your liking
Add filter xero - porcelain to your tube w following settings
Change blue channel to 0 and hit ok
Add drop shadow to your tube
Delete background layer - merge visible
Crop tag to your liking
Add credits and name
Friday, March 20, 2015

*click on image to view full size*
PTU Dreaming of Spring
This tutorial was written by me on March 20, 2015.
It was made out of my own creation and any similarity is purely coincidental.
I used pspx6 but any version should work without problems.
If you're doing this tutorial you must have good psp knowledge and be familiar with the tools.
Let's get started!
Artist: Angel by Laguna Art
Scrapkit: Dreams by Scrappin With Lil Ole Me
or HERE
Mask: FM3 by DDD
Font: Plaster of Paris
Plugin: Xero - Porcelain
*open your mask and minimize in your workspace*
c/p = copy and paste, ds = drop shadow
File - New - 700x700 - flood fill w white
Click on background with magic wand - new layer
Open paper of choice - c/p into selection - deselect
Layers - New mask layer - From Image
Find your mask in source window - hit ok
Merge group
Open 146 - place to the right some
Click inside your frame w magic wand - expand selection by 5
Add a new layer
Open paper9 - c/p into selection - deselect
Move paper under frame
Add drop shadow to your frame
Open 107 - resize by 50% 2 times - sharpen - place to bottom left - ds
Open 97 - resize by 50% 2 times - sharpen - place to bottom left - ds
Open 95 - resize by 80% - place to left - flip horizontal - ds
Open 88 - resize by 50% 2 times - sharpen - place to left - ds
Open 60 - place to the right - ds
Open 25 - resize by 65% - place to bottom right - ds
Open tube - resize to liking - place to bottom
Xero - radiance - change beauty to 76 - hit ok
Add drop shadow to your tube
Open 74 - resize by 50% 2 times - sharpen - place to bottom - ds
Open 57 - resize by 50% 2 times - sharpen - place to bottom - ds
Open 49 - resize by 50% 2 times - sharpen - place to bottom - ds
Open 4 - resize by 50% 2 times - sharpen - place to bottom left - ds
Open 70 - resize by 50% 2 times - sharpen - place to bottom - ds
Delete background - merge visible
Add credits and name to your tag
Crop if you desire
Sunday, March 1, 2015

*click on image to view full size*
PTU Spring Love
This tutorial was written by me on March 1, 2015.
It was made out of my own creation and any similarity is purely coincidental.
I used pspx6 but any version should work without problems.
If you're doing this tutorial you must have good psp knowledge and be familiar with the tools.
Let's get started!
Artist: Julie by Origash
Scrapkit: Spring Fever by Kizzed by Kelz
Mask: Flora mask by Dangerously Delicious Designz
Font:
*open your mask and minimize in your workspace*
c/p = copy and paste, ds = drop shadow
File - New - 700x700 - flood fill w white
Open 99 - c/p as new layer - ds
Open 90 - c/p as new layer - move to left some - ds
Open 73 - place to middle and then top - ds
Open 30 - place to the left - ds
Open 1 - resize by 65% - c/p as new layer
Click inside your frame w magic wand - expand selection by 5
Add a new layer
Open paper2 - c/p into selection - deselect
Move paper under frame
Add drop shadow to your frame
Open 42 - place to the right - ds
Open 74 - place to right - ds
Duplicate - mirror
Open 21 - resize by 50% 2x - sharpen - place to bottom - ds
Open 47 - resize by 50% - place to left - ds
Open 34 - resize by 50% 2x - sharpen - place to bottom left - ds
Open tube - resize to liking - c/p as new layer - place to right - ds
Open 76 - resize by 50% 2x - sharpen - place to bottom - ds
Open 101 - resize by 50% 2x - sharpen - place to bottom right - ds
Delete background layer - merge visible
Add credits and name
Crop if you like
Friday, February 27, 2015

*click on image to view full size*
PTU Kisses to You
This tutorial was written by me on February 27, 2015.
It was made out of my own creation and any similarity is purely coincidental.
I used pspx6 but any version should work without problems.
If you're doing this tutorial you must have good psp knowledge and be familiar with the tools.
Let's get started!
Artist: Romantic Girl by Laguna Art
Scrapkit: Love me Not by Scrappin With Lil Ole Me
Font: Inspiration
*open your mask and minimize in your workspace*
c/p = copy and paste, ds = drop shadow
File - New - 700x700 - flood fill w white
Open 180 - c/p as new layer
Open 164 - c/p as new layer
Open 177 - c/p as new layer
Click inside your frame w magic wand - expand selection by 5
Add a new layer
Open paper1 - c/p into selection - deselect
Move paper under frame
Add drop shadow to your frame
Open 136 - move to left some - ds
Open 83 - resize by 50% 2x - sharpen - place to the bottom right - ds
Open 115 - resize by 50% 2x - sharpen - place to the left - ds
Open tube - resize to liking - sharpen - add drop shadow
Open 87 - resize by 50% 2x - sharpen - place to the bottom right - ds
Open 174 - resize by 50% 2x - sharpen - place to the bottom right - ds
Open 175 - resize by 50% 2x - sharpen - place to the bottom left - ds
Open 195 - resize by 50% 2x - sharpen - place to the bottom - ds
Delete background - merge visible
Add credits and name
Thursday, February 26, 2015
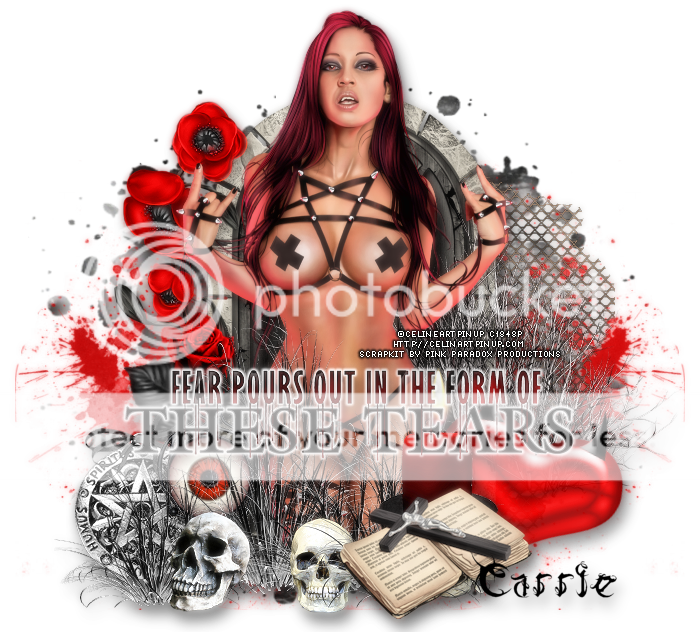
*click on image to view full size*
PTU Devilish Desire
This tutorial was written by me on February 26, 2015.
It was made out of my own creation and any similarity is purely coincidental.
I used pspx6 but any version should work without problems.
If you're doing this tutorial you must have good psp knowledge and be familiar with the tools.
Let's get started!
Artist: Morgane by Celine Art
Scrapkit: Devil Woman by Pink Paradox Productions
Mask: DBV mask 113
Plugins: Eyecandy - gradient glow
Font: Diablo
*open your mask and minimize in your workspace*
c/p = copy and paste, ds = drop shadow
File - New - 700x700 - flood fill w white
Click on background with magic wand - new layer
Open paper4 - c/p into selection - deselect
Layers - New mask layer - From Image
Find your mask in source window - hit ok
Merge group
Open 201 - resize by 50% - place to bottom right
Duplicate - mirror
Open 185 - resize by 50% - place to the right - ds
Open 113 - resize by 50% - place to the right - ds
Open 175 - resize by 50% - place to the left - ds
Open 172 - resize by 50% 2x - sharpen - place to the left - ds
Open 141 - resize by 50% - place to the bottom right - ds
Open 134 - resize by 50% 2x - sharpen - place to the bottom left - ds
Open 161 - resize by 50% - place to the right - ds
Open tube - resize to liking - c/p as new layer - place to bottom - ds
Open 160 - resize by 50% - place to bottom left - ds
Open 73 - resize by 50% 2x - sharpen - place to the bottom right - ds
Open 69 - resize by 50% 2x - sharpen - place to the bottom right - ds
Open 196 - resize by 50% 2x - sharpen - place to the middle and down some
Eye candy - gradient glow w these settings:
(Basic) glow width 3 - soft corners 25 - overall opacity 100
draw only outside selection checked
(Color) Medium - hit ok
Add drop shadow to your wordart
Delete background - merge visible
Adjust - Brightness and Contrast
Local Tone Mapping - strength 4.0 - Block Size 35 - hit ok
Add credits and name
Wednesday, February 18, 2015
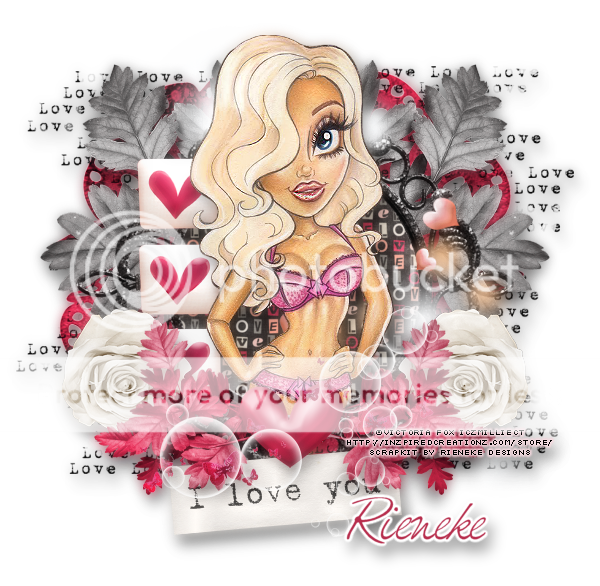
*click on image to view full size*
PTU Everyday Love
This tutorial was written by me on February 18, 2015.
It was made out of my own creation and any similarity is purely coincidental.
I used pspx6 but any version should work without problems.
If you're doing this tutorial you must have good psp knowledge and be familiar with the tools.
Let's get started!
Artist: Callie by Victoria Fox
Scrapkit: Dude I Love You by Rieneke Designs
Font: Felicity Script
*open your mask and minimize in your workspace*
c/p = copy and paste, ds = drop shadow
File - New - 700x700 - flood fill w white
Open 2 - resize by 90% - c/p as new layer - ds
Open 71 - resize by 70% - place to the left - ds
Duplicate and move to the right - merge down
Open 81 - resize by 50% - place to top left - ds
Duplicate - mirror
Open 26 - resize by 75% - c/p as new layer
Click inside your frame w magic wand - expand by 5 - new layer
Open paper8 - c/p into selection - deselect
Move paper under frame
Add drop shadow to your frame (26)
Open 27 - resize by 75% - place to the right - ds
Open 87 - resize by 50% - place to the left - ds
Open 86 - resize by 50% 2x - sharpen - place to bottom left - ds
Duplicate - mirror
Open tube - resize to liking - c/p as new layer and place to bottom of frame
Sharpen your tube and add a drop shadow
Open 19 - resize by 50% - place to the bottom - ds
Open 80 - resize by 50% - place to bottom left - ds
Duplicate - mirror
Open 20 - resize by 50% 2x - sharpen - place to bottom - ds
Open 17 - resize by 50% - place to bottom - ds
Delete background - merge visible
Adjust - Brightness and Contrast
Local Tone Mapping - strength 4.0 - Block Size 35 - hit ok
Add credits and name
Sunday, February 15, 2015

*click on image to view full size*
PTU So Sweet
This tutorial was written by me on February 15, 2015.
It was made out of my own creation and any similarity is purely coincidental.
I used pspx6 but any version should work without problems.
If you're doing this tutorial you must have good psp knowledge and be familiar with the tools.
Let's get started!
Artist: Sexy Pop by Arthur Crowe
Scrapkit: Sweet Love Kit by Niqui's Designs
Mask: 19 by Moonbeams and Spiderwebs
Font: any of choice
*open your mask and minimize in your workspace*
c/p = copy and paste, ds = drop shadow
File - New - 700x700 - flood fill w white
Click on background with magic wand - new layer
Open paper17 - c/p into selection - deselect
Layers - New mask layer - From Image
Find your mask in source window - hit ok
Merge group
Open 28 - resize by 70% - c/p as new layer
Click inside your frame w magic wand - expand by 5 - new layer
Open paper of choice - c/p into selection - deselect
Move paper under frame
Open 2 - resize by 50% 2x - sharpen - place to top - ds
Add ds to your frame
Open 35 - resize by 50% - place to bottom left - duplicate - mirror - ds
Open 23 - resize by 50% - place to the left - ds
Open tube - resize to liking - c/p as new layer - mirror - place to right
Add dropshadow to your tube
Open 21 - resize by 50% 2x - sharpen - place to bottom - ds
Open 54 - resize by 50% - place to left - ds
Open 32 - resize by 50% 2x - sharpen - place to top left - ds
Open 53 - resize by 50% 2x - sharpen - place to bottom - ds
Open 70 - resize by 50% 2x - sharpen - place to bottom left - ds
Delete background - merge visible
Adjust - Brightness and Contrast
Local Tone Mapping - strength 4.0 - Block Size 35 - hit ok
Add credits and name
Subscribe to:
Posts
(Atom)
MY BLINKIE
