Sunday, December 21, 2014
*click on image to view full size*
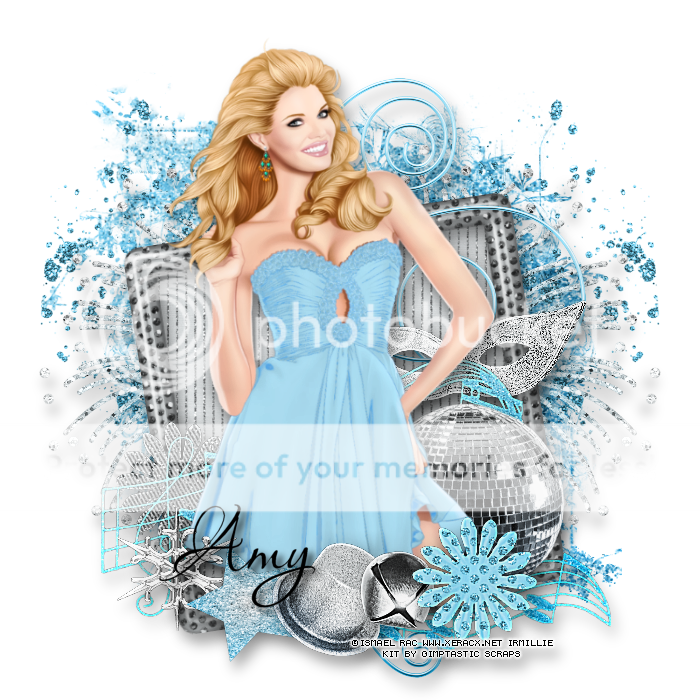
PTU Ready for The Party
This tutorial was written by me on December 21, 2014.
It was made out of my own creation and any similarity is purely coincidental.
I used pspx6 but any version should work without problems.
If you're doing this tutorial you must have good psp knowledge and be familiar with the tools.
Let's get started!
Artist: 2013 Valentine's Date by Ismael Rac
Scrapkit: Birthstone Series: Blue Topaz by Gimptastic Scraps
Mask: 44 by MB and SW
Font: Aquarelle
*open your mask and minimize in your workspace*
c/p = copy and paste, ds = drop shadow
File - New - 700x700 - flood fill w white
Open frame 4 - resize by 65% - rotate left some
Click inside your frame w magic wand - expand by 5 - new layer
Open paper1 - c/p into selection - deselect
Move paper under frame
Add ds to your frame
Open flower 1 - resize by 50% - place to bottom left - ds
Open swirl - place to the right - ds
Open mask - place to the right - ds
Open music notes - resize by 80% - place to bottom right - ds
Open disco ball - resize by 65% - place to bottom right - ds
Open tube
Recoloring tube to match the kit
Find the layer on the tube that is blue
Use your dropper tool to pick the light blue that matches
Make that your foreground color
With your color changer tool - left click on the blue layer of the tube
Do this until you are happy that it matches the way you like
Copy merged - place to the middle - resize to liking
Xero - radiance - change beauty to 71 - hit ok
Add drop shadow to your tube
Open snowflake - resize by 50% - place to bottom left - ds
Open star - resize by 50% - place to bottom right - ds
Open hat - resize by 50% - place to bottom - ds
Open bell - resize by 50% - place to bottom - ds
Open flower 2 - resize by 50% - place to bottom - ds
On background layer
Click on background with magic wand - new layer
Open paper5 - c/p into selection - deselect
Layers - New mask layer - From Image
Find your mask in source window - hit ok
Merge group
Resize mask by 90%
Duplicate mask - change blend mode to multiply - opacity to 63
Open glitter - place to left
Duplicate - mirror
Open fireworks - place to left
Duplicate - mirror
Delete background layer - merge visible
Adjust - Brightness and Contrast
Local Tone Mapping - strength 4.0 - Block Size 35 - hit ok
Add credits and name
Subscribe to:
Post Comments
(Atom)
MY BLINKIE

0 comments:
Post a Comment