Sunday, March 29, 2015

*click on image to view full size*
PTU You Bring Me Sunshine
This tutorial was written by me on March 29, 2015.
It was made out of my own creation and any similarity is purely coincidental.
I used pspx6 but any version should work without problems.
If you're doing this tutorial you must have good psp knowledge and be familiar with the tools.
Let's get started!
Artist: Hippity by Salisan Al Giab
Scrapkit: Sunshine by Rissa's Designs
Mask: 104 by me HERE
Font: Plaster of Paris
*open your mask and minimize in your workspace*
c/p = copy and paste, ds = drop shadow
File - New - 700x700 - flood fill w white
Click on background with magic wand - new layer
Open paper8 - c/p into selection - deselect
Layers - New mask layer - From Image
Find your mask in source window - hit ok
Merge group
Open 43 - c/p as new layer
Click inside your frame w magic wand - expand selection by 5
Add a new layer
Open paper4 - c/p into selection - deselect
Move paper under frame
Add drop shadow to your frame
Open 99 - resize by 50% - place to the right - ds
Open 68 - resize by 50% 2x - sharpen - place to bottom right - ds
Open 71 - resize by 50% - place to the left - ds
Open tube - resize to liking - c/p as new layer - place to right
Add drop shadow to your tube
Open 50 - resize by 50% 2x - sharpen - place to bottom right - ds
Open 49 - resize by 50% 2x - sharpen - place to bottom right - ds
Open 54 - resize by 50% - place to bottom left - ds
Open 97 - resize by 50% 2x - sharpen - place to bottom left - ds
Open 64 - resize by 50% 2x - sharpen - place to bottom - ds
Delete background layer - merge visible
Add credits and name
Tuesday, March 24, 2015
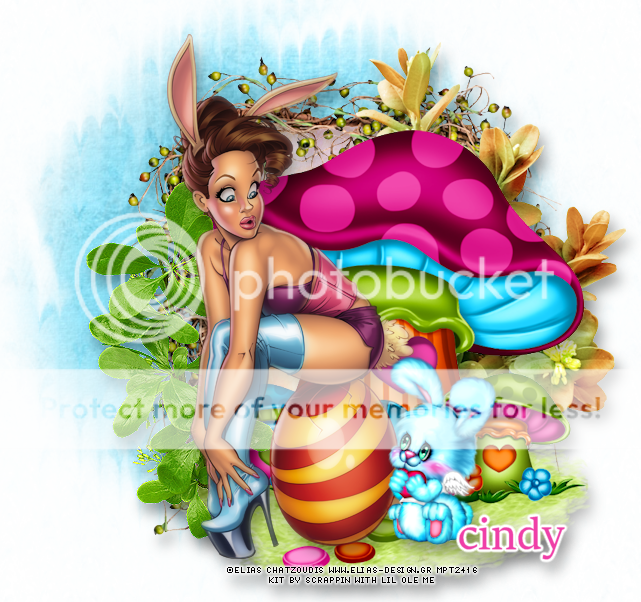
*click on image to view full size*
PTU Springy Bunny
This tutorial was written by me on March 24, 2015.
It was made out of my own creation and any similarity is purely coincidental.
I used pspx6 but any version should work without problems.
If you're doing this tutorial you must have good psp knowledge and be familiar with the tools.
Let's get started!
Artist: Happy Easter Babe by Elias Chatzoudis
Scrapkit: Karrot Patch by Scrappin With Lil Ole Me
Mask: DBV 106
Font: Sitka Heading
This will be quick and easy :)
*open your mask and minimize in your workspace*
c/p = copy and paste, ds = drop shadow
File - New - 700x700 - flood fill w white
Click on background with magic wand - new layer
Open paper17 - c/p into selection - deselect
Layers - New mask layer - From Image
Find your mask in source window - hit ok
Merge group
Open 56 - resize by 80% c/p as new layer
With your selection tool draw a rectangle around the frame
Add a new layer
Open pp16 then copy and paste into selection - deselect
Move paper under the frame
Add drop shadow to your frame
Open 111 - resize by 75% - place to the right - ds
Open 80 - resize by 75% - place to bottom right - ds
Open 127 - resize by 50% - place to the left - ds
Open tube - copy and paste to your liking
Add filter xero - porcelain to your tube w following settings
Change blue channel to 0 and hit ok
Add drop shadow to your tube
Delete background layer - merge visible
Crop tag to your liking
Add credits and name
Friday, March 20, 2015

*click on image to view full size*
PTU Dreaming of Spring
This tutorial was written by me on March 20, 2015.
It was made out of my own creation and any similarity is purely coincidental.
I used pspx6 but any version should work without problems.
If you're doing this tutorial you must have good psp knowledge and be familiar with the tools.
Let's get started!
Artist: Angel by Laguna Art
Scrapkit: Dreams by Scrappin With Lil Ole Me
or HERE
Mask: FM3 by DDD
Font: Plaster of Paris
Plugin: Xero - Porcelain
*open your mask and minimize in your workspace*
c/p = copy and paste, ds = drop shadow
File - New - 700x700 - flood fill w white
Click on background with magic wand - new layer
Open paper of choice - c/p into selection - deselect
Layers - New mask layer - From Image
Find your mask in source window - hit ok
Merge group
Open 146 - place to the right some
Click inside your frame w magic wand - expand selection by 5
Add a new layer
Open paper9 - c/p into selection - deselect
Move paper under frame
Add drop shadow to your frame
Open 107 - resize by 50% 2 times - sharpen - place to bottom left - ds
Open 97 - resize by 50% 2 times - sharpen - place to bottom left - ds
Open 95 - resize by 80% - place to left - flip horizontal - ds
Open 88 - resize by 50% 2 times - sharpen - place to left - ds
Open 60 - place to the right - ds
Open 25 - resize by 65% - place to bottom right - ds
Open tube - resize to liking - place to bottom
Xero - radiance - change beauty to 76 - hit ok
Add drop shadow to your tube
Open 74 - resize by 50% 2 times - sharpen - place to bottom - ds
Open 57 - resize by 50% 2 times - sharpen - place to bottom - ds
Open 49 - resize by 50% 2 times - sharpen - place to bottom - ds
Open 4 - resize by 50% 2 times - sharpen - place to bottom left - ds
Open 70 - resize by 50% 2 times - sharpen - place to bottom - ds
Delete background - merge visible
Add credits and name to your tag
Crop if you desire
Sunday, March 1, 2015

*click on image to view full size*
PTU Spring Love
This tutorial was written by me on March 1, 2015.
It was made out of my own creation and any similarity is purely coincidental.
I used pspx6 but any version should work without problems.
If you're doing this tutorial you must have good psp knowledge and be familiar with the tools.
Let's get started!
Artist: Julie by Origash
Scrapkit: Spring Fever by Kizzed by Kelz
Mask: Flora mask by Dangerously Delicious Designz
Font:
*open your mask and minimize in your workspace*
c/p = copy and paste, ds = drop shadow
File - New - 700x700 - flood fill w white
Open 99 - c/p as new layer - ds
Open 90 - c/p as new layer - move to left some - ds
Open 73 - place to middle and then top - ds
Open 30 - place to the left - ds
Open 1 - resize by 65% - c/p as new layer
Click inside your frame w magic wand - expand selection by 5
Add a new layer
Open paper2 - c/p into selection - deselect
Move paper under frame
Add drop shadow to your frame
Open 42 - place to the right - ds
Open 74 - place to right - ds
Duplicate - mirror
Open 21 - resize by 50% 2x - sharpen - place to bottom - ds
Open 47 - resize by 50% - place to left - ds
Open 34 - resize by 50% 2x - sharpen - place to bottom left - ds
Open tube - resize to liking - c/p as new layer - place to right - ds
Open 76 - resize by 50% 2x - sharpen - place to bottom - ds
Open 101 - resize by 50% 2x - sharpen - place to bottom right - ds
Delete background layer - merge visible
Add credits and name
Crop if you like
Subscribe to:
Posts
(Atom)
MY BLINKIE
